

Written by A.R.Jeffery 09.01.08
This tutorial was written using PSP ver 8.10
Some knowledge of Paintshoppro is assumed, but you are always welcome to email me if you have a problem.
You can download a Trial version of Corels Paint Shop Pro 12. Here
Materials Here
Unzip the Vector tube script to your 'scripts restricted' file. Export the hairball tube. Either tube or open the remaining images to your workspace.
You will need a Mist, Picture or tube of your own.
The Hairball was one of Hoods tubes. It used to be hosted by Tracirose but I can no longer find the site. My thanks to Hoods I have found so many uses for this tube.
The Vector Tube script is from Gary Bartons site, unfortunately Comcast seems to have messed up the download links so I have zipped it with my supplies. Many thanks to Gary his scripts are great.
Pixels Nook
Muras Copies-Plugin Here
Ok lets make our Fur.
Open a new Image 500x500 transparent.
Export your tube if you have not done so.
Tube-Hairball
Scale=45 Step=6 Continuous and Incremental.
Click four times in center of canvas.
Effects-Mura-Copies-Throw
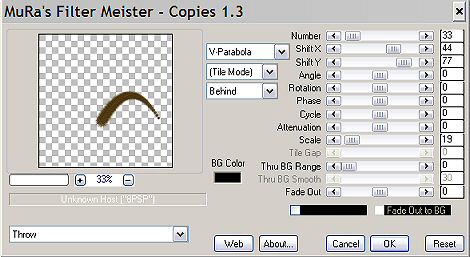
Click ok. Use mover tool to center image. Image-Canvas Size= 600x600pixels.
Adjust-Hue and Saturation-Colourise Hue=0 Saturation=0
Adjust-brightness/contrast.
Brightness=190 Contrast=25.
Adjust-Sharpness-Sharpen.
Effects 3D Effects-Drop Shadow with the following setting. You may wish to choose another colour or do this later.
Effects-Mura-Copies-Circle
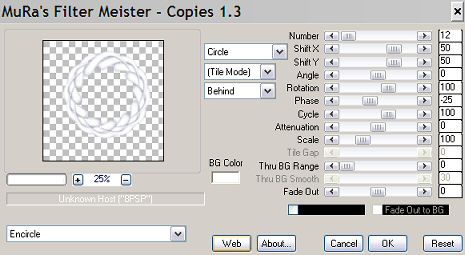
The bigger Shift x and Shift y numbers, the bigger your circle or ellipse.
To make a frame, or come to that any shape using this effect including font or dings. You first need The Vector Tube script from Pixels Nook. I have tested it in 8 and 10 but cannot vouch for higher versions.
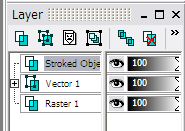
Draw a simple vector shape. I used the rectangle. Retain style checked. Draw out your shape. leave as a Vector image. Click the Tubes icon and set your Fur Tube as before. Find the Vector Tube Script and and click the button to run. Your Layer palette will now look like this.
You can re-use this method by highlighting the Vector layer and using a different tube, say a pearl for example. This will require different settings to the fur. Bring the new 'stroke layer to the top each time. Delete the vector layer when you are finished.
This works with all sorts of tubes, you just need to remember to set them up. Play until you find a setting you like and SAVE it.
NB: Lines and regular shapes like rectangles and squares can be done by setting your tube as previously. Line your cursor up where you wish to start and click once with your tube. Move the cursor to where the line should end (make sure the x co-ordinate is the same as the end x co-ordinate. So if you start on 100, 10. The end needs to 100, 410. for example.)
Hold down the Shift key and click once. Check the bottom right of your workspace for co-ordinates.

Thank you for trying my tutorial
Email
Tutorials
Home
Handcoded in Notepad.
All graphics and website design.
©Anita
2002-2008
|